Monday, June 29, 2015

Toshiba Tecra 730CDT


The Toshiba Tecra (dynabook TECRA in Japan) is series of business laptops manufactured by Toshiba. The Tecra series includes four notebook models. This model, the Toshiba Tecra 730CDT was a great portable system for its time in 1996. 


My interest in this particular model is for a computer that runs natively with Windows 95 and MS-DOS. Also a 9-Pin Serial (16550 UART compliant) and 25-Pin Parallel (8 bit ECP) port are necessary for my needs. 


This laptop was purchased on eBay and it came with a copy of Widows 95 installed, but I decided I would start with a fresh install and load Windows 98 instead. By doing this, I was able to avoid reinstalling sound and other drivers (here is the official Toshiba site where the drivers for this model can be found http://support.toshiba.com/support/modelHome?freeText=1073769796  )  All the necessary drivers for this computer were loaded automatically by Windows 98 SE.


Here are the basic specs:

Processor:   Pentium 150 MHz  
Installed Memory:   16 MB (EDO RAM) This unit has 48 MB!
Hard Drive:   2.1 GB IDE  
Display:  12.1 in. TFT Active Matrix  
Operating System:  Microsoft Windows 95  
Motherboard Bus Speed:  60 MHz  
Memory: Installed RAM  16 MB  
RAM Technology  EDO RAM  
Max Supported RAM  144 MB  
Installed Cache Memory  256 KB  
Hard Drive Capacity  2.1 GB  
Display Color Support  16-bit (64K colors)  
Display Max. Resolution  1024 x 768  
Video: Installed Video Memory  2 MB 
Manufacturer: Toshiba
Date: 1996

Here's an advertisement from a 1997 copy of PC World:


Quite an expensive investment during the time. $5599.79 in today's dollar is $8203.77

Monday, March 2, 2015

Apple IIe: Repairing the Disc II Drive

The Apple IIe system that I purchased was not fully functional. One of the Disk II drives was not working. This entry will cover in detail the repair of the disc drive system.

Inside the Apple IIe

Connecting the disk drive to the computer is not as easy as plugging a USB plug into a port. The top of the computer has to be removed for a connection to be made to the disk interface card. 

The cover of the Apple IIe is meant to be taken off with regularity; there are no screws attaching it. By applying pressure to the back tabs it will lift up. 


Inside, there is a series of seven Apple II bus slots at the rear of the motherboard that can take interface cards with up to a 50-pin card-edge. Numbered from left to right, slot 6 typically holds the disk interface card.


The disk drives are attached to two connectors on the interface card by way of a 20-pin ribbon cable. 
The connector is very easily misaligned on the controller card, which will short out a certain IC in the drive; if later connected correctly, a drive damaged this way will delete any disk inserted into it as soon as it starts spinning, even write-protected disks such as those used to distribute commercial software. 
This problem was apparently commonplace and it was the reason why Apple soon started printing several fat-print warnings about checking connector alignment in its manuals and used different connectors that could not be misaligned in its later drives. DB-19 adapters for the original Disk II were eventually available for use with Apple's later connector standard.

Inside the Disk II drive

Removing the disk drive case is simple. Four screws beneath the unit need to be removed and the case will slide back from the chassis. Inside a board on top holds the main electronic components. A quick survey in this case reveals a definite problem with a burned IC chip.


This chip is the Read amp, MC3470P. This IC is apparently the most common component to fail if the disk drive's ribbon cable is incorrectly connected to the interface card. Not only did the chip burn here, but it also damaged the IC socket that holds it in place. Both components will have to be replaced.

Further troubleshooting

Once the MC3470P was replaced, the drive was tested. It still didn't work. Using a copy of SAMS Computerfacts (a copy is here) for the Disk II, I made a check of the relevant components working with the new IC and then started a methodical swap of all the IC's by using the good components from the other working disk drive. 

It was discovered that the IC, SN74lS125N was't functioning. By replacing this component the disk drive now was fully operable and could read and write a floppy successfully.

Both of the replaced ICs, MC3470P and SN74lS125N, I was able to purchase from eBay for a nominal cost.

Disk II interface card

After making the repairs on the disk drive, it became apparent that their was also a problem with the Disk II interface card. The Drive 2 interface was malfunctioning. After some casual inspection of IC replacements, I decided the best solution was to buy a new interface card on eBay.


With the replacement card, I had both drives operating.


Thursday, February 19, 2015

Apple IIe Desktop System


Apple IIe


The Apple IIe needs no introduction. The Apple IIe is arguably the most successful computer Apple has ever produced. It was introduced on January 1983 and included the same 1.02 MHz 6502 processor as the Apple II (1977) and the Apple Plus (1979). The Apple IIe, however, included the new ProDOS operating system and Applesoft BASIC burned into the 32k ROM.

The IIe contained 64k RAM built-in, and allowed up to 128k RAM using the 80 column card which allowed 80 column text and an additional 64k RAM (much more RAM could be added later via third party hardware). The IIe also allowed upper and lower case letters be used allowing full functionality of the Shift and Caps Lock keys.

The main goal of the IIe was to create a professional computer for use in business. It served its purpose well, and also became abundant in schools and homes. All models were discontinued in November 1993. The entire Apple II series had a production run of 16 years!


Here are the Apple IIe specifications:

Microprocessor
6502 or 65C02 running at 1.023 MHz
8-bit data bus
Memory
64 KB RAM built-in
16 KB ROM built-in
Expandable from 64 KB up to 1 MB RAM or more
Video modes
40 and 80 columns text, white-on-black, with 24 lines¹
Low-Resolution: 40×48 (15 colors)
High-Resolution: 280×192 (6 colors)
Double-Low-Resolution: 80×48 (15 colors)
Double-High-Resolution: 560×192 (15 colors)
Audio
Built-in speaker; 1-bit toggling
Built-in cassette recorder interface; 1-bit toggle output, 1-bit zero-crossing input
Expansion
Seven Apple II Bus slots (50-pin card-edge)
Auxiliary slot (60-pin card-edge)
Internal connectors
Game I/O socket (16-pin DIP)
RF modulation output (4-pin Molex)
Numeric keypad (11-pin Molex)
External connectors
NTSC composite video output (RCA connector)
Cassette in/out (two 1⁄8-inch mono phono jacks)
Joystick (DE-9)

Apple Disk II


The Disk II Floppy Disk Subsystem, often spelled as Disk ][, is a 5¼-inch floppy disk drive designed by Steve Wozniak and manufactured by Apple Computer. It was first introduced in 1978 at a retail price of US$495 for pre-order; it was later sold for $595 including the controller card (which can control up to two drives) and cable. The Disk II was designed specifically for use with the Apple II personal computer family to replace the slower cassette tape storage and cannot be used with any Macintosh computer without an Apple IIe Card as doing so will damage the drive or the controller.

Apple Monitor II

The Apple Monitor II is a CRT-based green monochrome 12-inch monitor manufactured by Apple Computer for the Apple II personal computer family. It was introduce in 1984 and discontinued November 1993. Apple didn't manufacture the monitor until halfway through the lifespan of the II series.  Many home users of Apple II computers used their televisions as computer monitors before the Monitor II was released. It featured an inner vertical-swiveling frame. This allowed users to adjust the viewing angle up or down to suit their taste without the addition of a tilt-and-swivel device. The Monitor II was widely adjustable for the time, as it included adjustments for the size and location of the image on the screen. These adjustments had a very small influence on the picture, however, much to the disliking of some users. The Monitor II was designed for the Apple II+, but was used widely throughout the Apple II product line, most recognizably on the Apple IIe.

1984 costs of an Apple IIe system

In the Febuary 1984 issue of Byte magazine, there's an advertisement for the cost of an Apple IIe system:


A starter kit with monitor, disk drive and 80 col. card would run at $1365. In today's dollars that would be about $3,209.31.

There were also clones during this time as shown in this advertisement from Byte magizine:


Sunday, February 15, 2015

Gateway 2000 P5-100: Final system tweaks

Video and sound drivers

To finish up the install of all the operating systems, the video and sound drivers for the Gateway P5-100 must be installed . For Windows 95 and 98, an automatic install was made and this is not necessary.

The video and sound drivers were re-installed in Windows 3.1 as previously shown in an earlier blog entry.  Video is here and sound is here.

Installing the required drivers for the MS-DOS 6.22 partition has not been complete. I have found that the same sound driver install disk for Windows 3.1 can be used to install the DOS only drivers quite easily, but I have not found the appropriate DOS video drivers for the TRIO64 video card. However, this may not be a problem since the default 640x480 with 16 colors will most likely be fine for the DOS programs I plan to use on this system.

Optimizing MS-DOS memory

The common problem running old DOS programs from the early '80s is memory errors. MS-DOS-based programs require a certain amount of conventional memory to run, even when you run them in Windows. If you attempt to run an MS-DOS-based program that requires more conventional memory than is currently available on your computer, the program may not run correctly or at all, and an error message indicating that there is insufficient memory to run the program may be displayed. When this occurs, you must reconfigure your computer so that more conventional memory is available.

In order to solve this, some changes need to be made in the autoexec.bat and config.sys files. Adding the following lines to the existing autoexec.bat file (or modifying the appropriate line) is necessary:


LH c:\dos\smartdrv.exe
LH c:\apps\doskey.com -i
path c:\apps;c:\dos;c:\dos\net
set DIRCMD=/o:gne
set TEMP=c:\temp


Add (or modify) the following lines in the Config.sys file:

SWITCHES=/f
DEVICE=c:\dos\himem.sys /testmem:off
DEVICEHIGH=c:\dos\emm386.exe ram i=b000-b7ff
DOS=high,umb
BREAK=on
rem DEVICEHIGH=c:\dos\setver.exe

Leave all the other files intact. This will now load the older DOS programs without memory problems.

Monday, January 26, 2015

Gateway 2000 P5-100: Installing Multiple Operating Systems

Installing multiple operating systems on a vintage computer from the 1990's is not an easy task. There are major hurdles to overcome for this to be successful. The primary obstacle is getting past the requirement that requires the OS to be not only installed on the primary drive, but also the C: drive.

System Commander

One of the best solutions is to use a program that creates a multiple boot system. I believe the most successful and popular was System Commander. It was a boot manager/loader software application developed by VCOM.


System Commander had some unique features, that made intensive multi-boot users quite happy. It had a feature to keep partitions hidden, so when one OS loaded it could neither detect nor interfere with other OSs, installed on other partitions. This solved most of the problems involving primary and C: drive requirements. After installing multiple OS's, a menu at start up made it possible to choose which operating systems to boot.

I utilized this program back in the early 90's when I wanted to use Windows and OS/2. It was very successful, but I also remember how involved and cantankerous it could be. This hasn't change in my usage of it today.

System partition and boot partition

The system partition is the disk partition that contains the operating system folder, known as system root. 

The boot partition is a primary partition that contains the Master Boot Record (also called the boot loader), a piece of software responsible for booting the OS. It's located in the first sector of any hard disk or diskette that identifies how and where an operating system is located so that it can be boot (loaded) into the computer's main storage or random access memory.

System Commander replaces the master boot record with its own master boot record to control the boot up process.

Killdisk

Sometimes things go wrong. If the master boot record becomes corrupted, sometimes a re-partition and format will not solve the problem. I found that the best solution is to completely wipe the disk with a program called Killdisk.


Killdisk is powerful and compact DOS utility that allows you to destroy all data on hard and floppy drives completely, excluding any possibility of future recovery of deleted files and folders. In this case, the free version is suitable for use and can be downloaded here.

Setting up the disk drive

There are three major considerations for this system:
  1. The PC's limit of four primary partitions will not be exceeded.
  2. Each partition doesn't exceed 2GB 
  3. The active primary is located somewhere on the first 2GB of the hard disk.
This last consideration is what makes my plan difficult to achieve. I would like to install four OS's in its own primary partition, but each OS will have to be placed in the first 2GB of the hard drive. My newly installed hard drive is 10GB. So with a 2GB limitation, I'll will only be able to use 2GB of the 10GB storage.

To regain some of this space, I'll have to be creative in how I make my primary partitions. This is my breakdown: 
  • 62.6MB MS-DOS 6.22
  • 901MB Windows 3.11
  • 1GB Windows 95
  • 1.99GB Windows 98
How I managed to squeeze out the approx. 4GB total was to leave a small portion of the 2GB to make a fourth partition. This allowed enough space for the install of Windows 98. I was still allowed to max out this partition to the standard 2GB limitation. Unfortunately, making these partitions are not easy, and must be performed using System Commander and in a very precise order of installs.

I also must erase all the hard work I previously made in installing Windows 3.11 and all the required drivers.

Installing System Commander

In order to install System Commander, a boot-able partition and OS must be installed. Because of the quirks of Windows 3.11 and Windows 95, a precise series of installs must be made. The first OS must be Windows 3.11

Starting with a fresh drive, a 62.6MB primary partition was created and made active. MS-DOS and Windows 3.11 was installed.

Installing System Commander is a quick process started by a double-click on install.bat located on the single 3.5" install floppy (a copy made from the original is best since the install will write on the floppy). After a series of prompts the program will install.


After the install, a system reboot will show the boot manager on start up.


Windows 3.1 is essentially a shell of MS-DOS, so it will not be shown as such on the menu. Striking the ENTER key on the MS-DOS 6.22 selection will boot back into Windows 3.1.

Creating more partitions

In order to install another OS, the SCDISK Utility must be used. This can be found in the SC\ folder.
This utility will allow the boot manager to "hide" the C:\ primary OS and create a new partition which is bootable and ready for another OS install.

Run the SCDISK Utility and choose Change boot status for OS install from the menu. The next screen will look like this:


Another odd quirk of System Commander... MS-DOS 6.22 is listed here as 5.0. Ignore this and select Partition 1. ESC to exit.

The next screen will warn that the bootable status has changed. Be careful not to select OK. A reboot from this screen is necessary for this to work. Either press CTL-ALT-DEL or press a reboot button on the PC.

Now a new partition can be made (in this case a 62.6MB partition) for another OS install. This partition I plan to have only MS-DOS 6.22 installed.

This needs to be repeated two more times for Windows 95 and Windows 98 to be installed. Unfortunately, the only way to do this is to install MS-DOS 6.22 and copy the Windows 3.1 files from the first OS partition install to these locations. An UPGRADE version of Windows 95 and 98 must be installed over Windows 3.1.

This is quite a bit of work, but it insures a clean copy of all OS's without Windows trying to rewrite files in any other partition. However, after each Windows 95 and 98 install, the boot manager will disappear. Only by reinstalling System Commander, will the boot manager be restored. During this re-install, System Commander will alert that a potential virus has attacked the boot manager. This is because Windows 95 and 98 has re-written on the boot record. 


After all the OS's have been installed, and the boot manager restored, the startup menu should show four OS options and a drive A: boot option.


Editing the Boot Manager menu

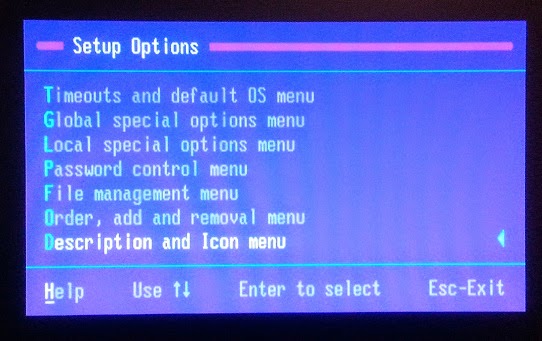
It's easy to edit the boot manager. On startup, Press the S key. This will bring up the Setup Options menu.


Choose D for the Description and Icon menu.


Re-naming and choosing the appropriate icons can be made here. After this editing, the startup boot manager (in this case) appears like this:


Each OS boots as a primary C:\ drive with the other partitions accessible as multiple letter drives.


Tuesday, January 6, 2015

Gateway 2000 P5-100: Installing Video Drivers

Windows 3.1 installed with a generic  640 x 480, 16 color VGA driver.

There was an option during the install process to install a driver from an OEM disk, but I did not chose to do this. Now, I would like to have my monitor display 640 x 480, 256 colors, but none of the supplied video drivers that come with Windows 3.1 will work.

The only way I'll know which video driver to locate will be to first identify the video card.


The Gateway P5-100 came with a S3 Trio64 video card made by STB Systems.

The S3 Trio range were popular video cards for personal computers and were S3's first fully integrated graphics accelerators. As the name implies, three previously separate components were now included in the same ASIC: the graphics core, RAMDAC and clock generator. The increased integration allowed a graphics card to be simpler than before and thus cheaper to produce.

Finding the driver for this card was not easy, but accomplished. I was able to find it here. It's a generic S3 driver for Windows 3.1.


Installing the video driver


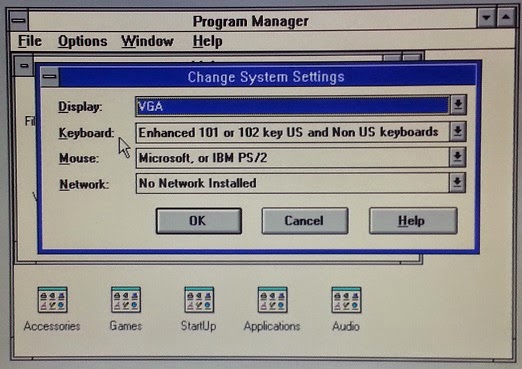
The driver is contained in the  zipfile, w3117004.zip. By copying the contents to a disk, the driver can be accessed by going to Windows Setup in Main. Selecting Options and then Change system Settings...


By scrolling through the list of drivers, at the bottom choose Other Display (Requires disk from OEM)...   

Select the A:\ with the floppy that contains the video driver files. There should be a list displayed of video driver options. I chose the S3 Trio64/32 1.70.04 640x480 256 C driver.


The driver will install and then stop and prompt for the S3 Flat Model Driver Disk. I don't know what this is, so I ignored it and selected Cancel.


This produced a warning screen that stated that the install was incomplete. I exited the window by selecting OK.


I went back to the Change System Settings window and located the newly installed video driver S3 Trio64/32 1.70.04 640x480 256 C that is now in the list of available drivers.


When it's selected, a new window will inform that the driver is already installed. I chose to keep the current driver.


Windows then prompts for a system re-boot for the changes to take place.


The video driver works great and the system now operates at 256 color on a 640x480 screen.


Sunday, January 4, 2015

Gateway 2000 P5-100: Installing Windows 3.1

My plan is to use a program that will allow different operating systems to be installed on one hard drive by using four primary partitions. I discovered it's best to start with my Windows 3.1 install.

Windows 3.1 was originally released on April 6, 1992; official support for Windows 3.1 ended on December 31, 2001, and OEM licensing for Windows for Workgroups 3.11 on embedded systems continued to be available until November 1, 2008.

Installation is simple. I have a six 1.44 MB floppy disks which makes the install. By running setup.exe from the DOS Shell the welcome screen will appear with directions. It will prompt you through a few screens in which I chose Express Setup. This will automatically configure the recommended settings for most users.


Once Windows is installed the desktop looks as follows:


The Program Manager is basically a shell program running on top of DOS 6.22. It's very much similar to the DOS Shell that I installed earlier. It's a MS-DOS graphical-shell-turned-operating-system.

Like modern Windows operating systems, Windows 3.1 has a bundle of tools and applications. The necessary apps for tweaking the system are located in Main. This holds the File Manager. It's a hierarchal file system stucture that allows easy access to all folders, sub-folder and files.

This can be seen in the following image:


The Main window also holds the Control Panel. This has various tools for changing the desktop appearance or making adjustments to various components of the system. The window can be seen here:


There are installed applications available in the Accessories window. Such as Write and Paintbrush. Paintbrush is still in use today (obviously upgraded) and I'm using my Windows 7 version now to re-size and crop these images. The Accessories window can be seen in the following image:


Re-installing the sound card drivers

Everything works well with the install, but there isn't sound. When I installed the sound driver for the Sound Blaster, I chose only a DOS install. In order for the sound to work in Windows 3.1, the install disks must be run again. This time when prompted, I chose to install the drivers in the Windows folder.

After this install, a new Audio folder appears in the Program Manager with some useful tools. These can be seen in the following image:


The most important tool for me is the Mixer Control. This is where the sound level can be set and by going into Options in the menu and choosing Save Settings On Exit, the start-up chime (the default tada in this case) will remain at the level chosen.